Splitter
USER MANUAL
Description
SUGARfx Splitter is a powerful layout design tool that allows you to split your video with style and create any complexity of layouts in a very simple and intuitive manner.
Splitter includes a set of 23 templates ready to be placed in your timeline and use them right out of the box or customize them as much as you want, to meet your creative needs.
SUGARfx Splitter is a powerful layout design tool that allows you to split your video with style and create any complexity of layouts in a very simple and intuitive manner.
Splitter can be found in the Titles browser, or under the Splitter category in the Themes browser.

Splitter was developed as title elements that can be placed on top of a section in the timeline to split the video underneath and add color, text or additional video clips within the same layout.

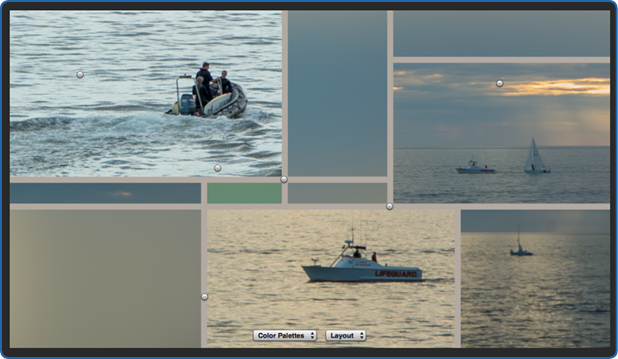
The Splitter interface
The Splitter templates offer complete control of the layout at any time and with an intuitive interface.
Simply click on the OSC Guides button to reveal the information that is unique to each template.

Splitter uses numbered panels that are shown when the OSC Guides button is enabled.
Here you can identify, not only the number of the panel that you want to modify, but also the location and purpose of the moveable control points that allow you to create new layouts or modify the optional Custom Videos’ position on screen.
At the bottom of the screen you will find a Color Palette drop down menu as well as a Layout menu where you can open or save your own custom layouts or color palettes.
The numbered panels on the screen will help you identify what is the corresponding parameter that needs to be customized.

Parameters
Build In : This button enables the animated build in transition.
Build Out : This button enables the animated build out transition.
SUGARfx Logo / Help : Get access to this Help document by clicking on the SUGARfx logo.
OSC Guide : Displays the unique layout distribution of panels of each template. Use this button when you need to identify the panel that needs to be modified.

TIP : If your template has been modified previously, the guides will show you the updated modification. –Use the Layout drop-down menu under the screen to open and/or save your own custom layouts.
TEXT
Every template has a unique location, size and orientation of the text element, therefore some of the templates may have a large or small scale setup, and there is no option to change individual text elements but all at once.
The Text section is where you can modify the text when you are using a panel containing Text.
The panels capable of using text are: the Main Panel, panel 1, panel 5, panel 6, panel 7 and panel 9.

EDIT TEXT : This button enables the full editing capabilities of the Text. When enabled, you are presented with a simple screen with the text in it, and you can use all of the built-in text editing functions available in Final Cut Pro X.

Font : A drop-down menu to select the font of your text.
Text : Type the text message here. You can use multiple lines if desired.
All Caps : A button to make your text capitalized throughout.
Size : The size of your text. (keep in mind that the text in your template will not display this size, but this size refers to the size of the text when using the EDIT TEXT mode.
Horizontal : Adjust the horizontal position of all instances of the text element in your template.
Vertical : Adjust the vertical position of all instances of the text element in your template.
CUSTOM VIDEOS
Every template has a unique location and size of the Custom Video elements, and their size and position can be changed individually.
The Custom Videos section is where you can add or modify each Drop Zone for their corresponding panel location.
The panels capable of using Custom Videos are: panel 1, panel 7 and panel 9.
TIP : Only the position (not the size or content) of each Custom Video can be saved when saving a Layout preset.

Position Control : A button that enables the visibility of all the control points in the interface.
Drop Zone 1, 2 and 3 : This is a standard Drop Zone used in Final Cut Pro X to add a video or still image into the Custom Video placeholders.
How to do it? : Click on the Drop Zone icon and then select the video or clip from the library... then press Apply Clip to use and apply the video into the selected Drop Zone.

Scale : Scales the video clip or still image applied into the Drop Zone.
COLORS
Splitter provides a full set of color parameters for extensive customizing.
The Colors section provides three (3) different sets of parameters to modify the splitting Lines and Width as well as the Text elements and the Color Panels.
Palette Selection : Choose the Palette from the drop-down menu, and then modify the color of your choice by following the numbers shown when the OSC Guide button is enabled.
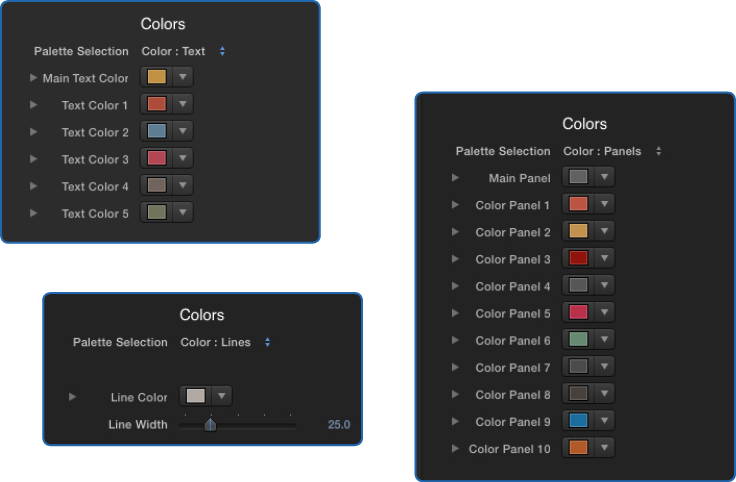
The Main Panel and the Main Text do not have a number and it is the central area between the Top and Bottom control points in the interface.
TIP : The colors can be saved as a preset when using the Color Palette drop-down menu under the screen.
ADVANCED SETTINGS
In this section you will find the true power of customizing of Splitter.
Here you can specify the contents of each panel in the Splitter layout, and each panel provides its own set of possibilities.

B&W See Through : A button that turns the underlying video in the timeline with a Black and White effect. –This is only possible when the panel has the selection set to See Through.
Main Panel : The Main Panel provides several options for displaying of its contents.
Note : The Main Panel does not have a number and it is the central area between the Top and Bottom control points in the interface.
Numbers 1 through 10 : These correspond to the Panel Numbers and each panel provides a drop-down menu with their own options to display in the layout.
Presets

Color Palettes : Use this drop-down menu to Save or Load custom color palettes previously saved. The Text colors as well as the Panel colors and the Line color is saved when creating a new Preset.
Layout : Use this drop-down menu to Save or Load custom layouts previously saved.
The Layout presets save only the position of the Custom Videos, and the division and size of the panels; NOT their contents, scale or colors.
Technical Support Note : We recommend that when you save your own preset, load it back in to make sure that it was saved correctly.
Technical Support
Our Technical support team is available to answer your questions via e-mail and should respond as soon as possible. (support@sugarfx.tv)
Help
The Help file (or the PDF version of this User Manual) is available when you open the FxFactory application and press on the Help button under the icon of the theme element.
Support
Please visit our web site (http://www.sugarfx.tv) for possible answers to your technical support issues, or visit our YouTube channel at (http://www.youtube.com/sugarfxtv) where you may also find a tutorial that will help you find the answer to your question.
Known Issues
(1) Potential problem when trying to save a Preset. Please make sure that when saving a Preset, you load it into a new template and try it out to make sure either the Color or Layout preset was saved correctly.
(2) When loading a Preset, you may need to do it again if it doesn’t load the first time. Then move the timeline so the Layout and colors get refreshed and display in their correct position.
There are no more issues that we are aware of, at the time of release of this product.
Don't have it yet? - Download and Try.
You can download and install the free trial as part of FxFactory.
|
|
© Copyright 2014 SUGARfx |


Tutorials
![]()
Works In:
 |
Final Cut Pro X |